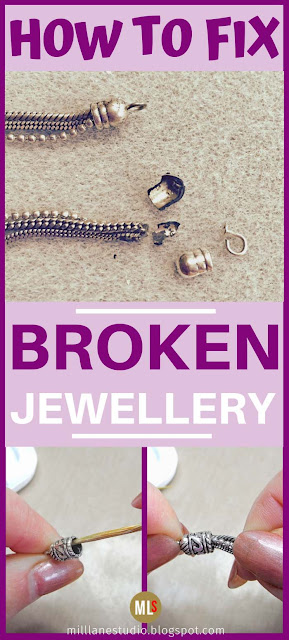
On the morning of my daughter's recent wedding, a guest who was staying with us had a jewellery disaster - one of the end caps on her necklace disintegrated and her necklace fell apart. We were about to leave for the church so there wasn't time for a repair but after a quick hunt around the studio, I found something suitable for her to wear. Crisis averted!
A couple of days after the wedding, I did a quick and secure repair on the necklace.
The problem with this necklace is that some of the "metal" components are not metal at all! They appear to be plastic, painted to look like silver. If you look at the photo below you can see that the bottom end cap has disintegrated. There is also a head pin with a loop that was inserted through the end cap to connect the chains to the rest of the components.
 |
| The disintegrated end cap was made of plastic and painted to look like silver. |
How to Replace a Broken End Cap
The first thing to do was find the right size end cap to replace it. I had some Bali-style end caps with a built in loop which worked well with the style of the necklace but they were different to the original, so they would need to be replaced on both sides of the necklace. To remove the other one I simply used pliers to crush it.Here's what you'll need:
- End caps (choose the diameter to comfortably fit the cords or chains)
- 5-minute epoxy adhesive (I like Araldite because it works on so many materials and it sets up quickly, meaning you don't have to hold the items in position for long.)
- Toothpick
- Denatured alcohol and a cotton bud (Q-tip) for clean up
Apply some epoxy to the ends of the chains as well. Insert the group of chains into the cord end and hold for a moment. Clean up any adhesive which has oozed out with the denatured alcohol and then set the components down so that the chains remain in position.
I like to leave it to cure for a couple of hours to make sure the bond has set before continuing to work. It will get stronger as it cures. Then it's just a matter of connecting all the components back together.
You can see the new component on the left chain and the old component on the right chain. The antiqued silver end cap fits in well with the other components.
And here's the necklace repair completed.
You would use this exact same technique if you were attaching end caps to leather cord. It's a great method for connecting different kinds of materials together because it's simple and secure and most importantly, it gives the piece a professional finish.
Want to see some other jewellery repairs I've tackled? Take a look at these related posts:
On Safari necklace with Fireline
Rosary Chain necklace
Multi strand Freshwater Pearl necklace with beading wire
Pin this!
'Til next time.....

If you can't get enough of My Tutorials and you want even more inspiration, click here to find my books and printable pdfs


No comments
Post a Comment