Well, here are some ideas to get your started.
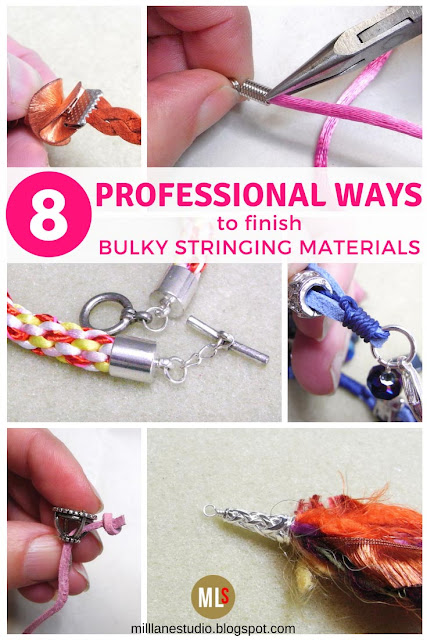
- Coil ends - Perfect for round materials like satin cord and round leather. Just place the cord in the coil and use a pair of chain nosed pliers to squash down the last coil of the cord end to secure the cord in place.

- Fold-over cord ends. These come in a couple of different styles. The first one has two side flaps and one top flap and the second style has just two side flaps. These work really well for flat, narrow materials.
Place the ribbon or suede lace into the opening and fold down the top flap over the ribbon. Then use flat nosed pliers to fold one side into the middle, and then the other. Omit the first step if you are using the second type of cord end.
- Ribbon ends (also known as C crimps). These are ideal for any flat material such as ribbon, suede lace, wire lace and plastic mesh tubing to name a few. Place the ribbon into the opening and use flat nosed pliers to press the top and bottom together. The teeth of the ribbon end gently clamp into the cord to give a neat and secure finish.

- Cord endcaps. These work really well on bulky cords such as kumihimo braids. You will need to smear a thin layer of a strong adhesive such as epoxy resin, G-S Hypo Cement
or E6000
around the inside of the endcap and then insert the cord. Leave it to dry to full strength (according to the manufacturer's instructions) before wearing it. You can see a really clear video of how to do this at Lytha Studios

- Cones. These work really well for bulky fibre necklaces.
 Fold the ends of the fibres over (you will trim these ends away when you're finished so make sure your fibres are longer than the finished length of your necklace) and pass a length of 20-22g wire around the fold. Twist the two wire tails around each other and then thread one through the cone.
 Create a wrapped loop above the cone and attach to the clasp. Now trim away the excess fibres and wire from the tail you created.
- Wire wrapping is another way to finish the ends of a fibre necklace. Once again, you will need to fold the fibres over at the end. Take a length of 22g wire and wrap it around and around the fibres to create a coil. Remember to leave a space at the top so that you will be able to thread a jump ring through. Pearl Blay over at the Beading Gem has a good tutorial on how to do this.
- You can do a similar thing with round leather and synthetic cords. Line up the bundle of cord ends and select one of those cords to wrap around the others. Fold them over as you did for the bundle of fibres. Hold all the cords taut and bend the binding cord back on itself at the point you want to create the wrapped knot. Place your thumb and finger over the that point and then begin to coil the binding cord around the bundle until you almost reach the point where you originally folded the binding cord back onto itself. Thread the tail of the binding cord through that loop and pull and the cords will be secure.

- Real Leather Bird Cage Knot Tie Clasp with a magnetic closure. This is one of the clever jewellery findings from Jill McKay's range for ReaLeather.
 These are so simple to use: just thread your stringing material through the top and pull out through one of the side openings; tie a single knot; and then pull it back inside the bird cage.
  How neat is that?!
Do check these out because they are a really classy way of finishing your leather jewellery.
If you liked this post, you might also like this one:
Neat Finishes for Leather Bracelet Ends
Pin these tips for later!
'Til next time.....

If you can't get enough of My Tutorials and you want even more inspiration, click here to find my books and printable pdfs


No comments
Post a Comment