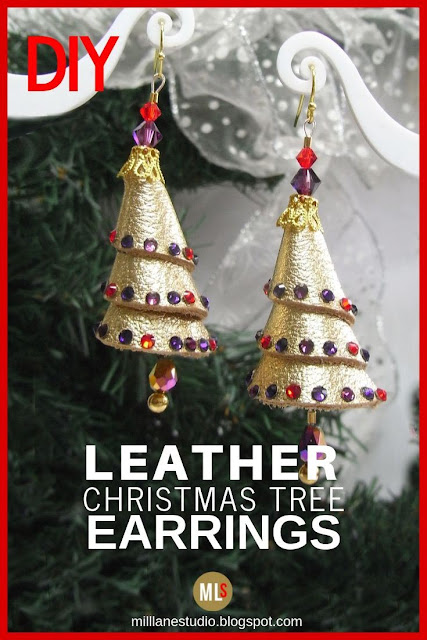
The simple but clever construction of these earrings is made possible because of the flexibility of the gold leather - it can be easily rolled, holds its form, it's lightweight, and has the look of precious metal - all in all, it makes for a very luxe pair of earrings!
So, here's what you'll need:
- Sizzix Leather trim piece, Metallic Gold
- 7-Strand 0.018-Inch Bead Stringing Wire, Silver Rose
- 2 x 6mm Amethyst Swarovski bicones
- 2 x 4mm Lt Siam Swarovski bicones
- 3mm Swarovski flat back crystals: 36 x Purple Velvet
; 18 x Amethyst
; 18 x Lt Siam
- 2 pink/gold iris finish teardrop beads
- 2 x 8x7mm gold basket bead caps
- 2 x gold crimp covers
- 6 Size #2 gold crimps
Other: Create Your Style Crystal glue pen
Trace a 5.5cm (2 ⅛") circle on the leather
Find the centre of the circle using a centring ruler if you have one. If not, line up the 2.25cm mark on one edge and the 7.75cm mark on the other edge. Place a mark at 5cm. Now do the same thing across the other side and place a mark. Where the two points intersect is the centre.
Cut a slit from the edge of the leather to the centre point.
Measure 3mm (⅛") out from the centre point and place a dot. Continue doing this all around the centre point to create a circle of dots.
Cut the circle out.
Place a dot 2mm (1/16") from the cut edge directly across from the slit. Place a mark at 3 o'clock and 9 o'clock. Place a mark 2mm (1/16") on either side of the slit.
Set the multi-hole punch to 1mm and punch each of the holes.
Position the crystals evenly around the edge of the leather and when you're happy with their placement, pick them up one by one with the Embellie Gellie tool, place a small dot of adhesive and then reposition the crystal. Allow the adhesive to dry.
Cut 20cm (8") beading wire. String on a crimp and insert the tail back through the crimp creating a small loop. Crimp the beading wire.
Place a crimp cover over the crimp, position it in the jaws of the Mighty Crimper and close the seam around the crimp .
String a tear drop and another crimp. Crimp the crimp tube.
Insert the beading wire through the hole on the left hand side of the slit, from the back to the front. Draw it up until the tear drop bead hangs partly below the edge of the circle.
Insert the beading wire through the next hole, once again from the back to the front and pull it up to remove any slack in the wire. Continue in this way until all five holes have been threaded.
Roll the circle of leather
Glue the edge of the slit to the cone by applying a thin layer of leather cement to the edge with the toothpick and hold it in position a minute or two until it dries. A thin layer of adhesive will grab much faster than a thick layer and will be much less messy.
String on a bead cap
Trim away the excess wire and attach the earring wire. Trim away the loop below the crimp cover of the dangle as close as possible.
Make a second earring to match.
For a great Christmas gift, why not treat yourself to a copy of my book, Stylish Leather Jewelry.
You'll find many more ideas on how to roll, loop, twist and recolour leather to create stylish jewellery that is anything but conventional. It's available from Michaels and Hobby Lobby in the US and online booksellers around the globe. Or, if you'd like a signed copy, visit my website, Mill Lane Studio and I'll be happy to inscribe your copy for you.
Pin this Project!
'Til next time.....

If you can't get enough of My Tutorials and you want even more inspiration, click here to find my books and printable pdfs


No comments
Post a Comment